


My Glue Chipping Journey
I will never forget the first time I saw Glue Chipping in a sign. It happened during my visit to Disneyland Anaheim with my now-wife. We passed an ornate Pop Corn Stand in the park when it caught my attention. I have written an article about this experience, which you can Read Here

Since then, I have been fascinated by the beauty of glue-chipped glass and the scientific process behind creating it and over the years, I have conducted numerous experiments to gain a comprehensive understanding of the process, including what to do and what not to do.
I have also completed hundreds of glue-chipping projects, which has helped me master this technique. However, I must admit that my journey could have been more flawless, and I have experienced many failed attempts and disasters to reach this point. But that’s just part of the learning process when mixing art and science.
Recently, while putting together my latest glue-chipping course, I reflected on my journey and the critical elements that you must consider to achieve perfection when chipping glass. This reflection led me to ask the question: If I were to start in Glue Chipping today, what are the top five things I would want to know to give me a head start and ensure my success out of the gate?
I want to share with you my top five tips for achieving success with glue-chipping glass. They are not ranked in any particular order, but they are things that I wish I had known when I started, and they will help you on your glue-chipping journey.
1. The Importance of Properly Sandblasting Your Glass:

Sandblasting is a crucial step to achieve successful glue chipping. It cleans the glass surface and creates a micro-texture that helps the glue adhere effectively. Before applying the glue, ensure the glass is thoroughly cleaned and evenly sandblasted. Inconsistent sandblasting can lead to uneven chipping patterns and imperfections in the final piece, as the glue won’t bond evenly to the glass and will result in an inconsistent chipping pattern as the glue dries. To avoid this, you should always brush off the remaining dust created by the sandblaster.
Additionally, you should check that there is no oil build-up in your compressor and that you have an extractor fitted for oil and water. I use 220 grit size aluminium oxide for sandblasting. It is essential to follow these guidelines to achieve consistent results.
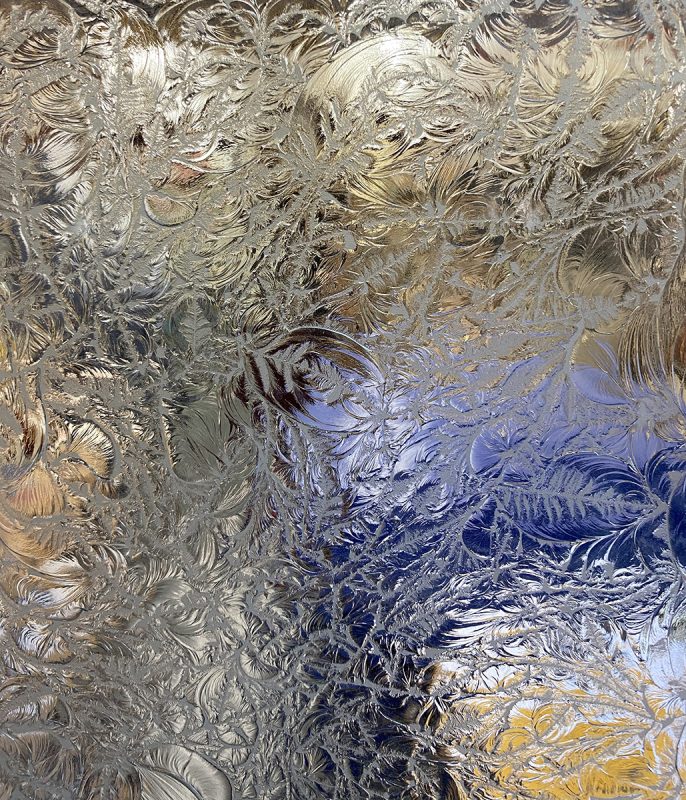
2. Creating Intricate Fern Patterns In Your Glue Chipping:

As I developed my understanding of the chipped glass-making process, I observed that different methods resulted in intricate and unique patterns in the finished product. One of these patterns is the fern pattern, which creates a stunning effect that resembles delicate fern leaves throughout the glass.
Over the years, I have noticed that this pattern occurs more frequently during the summer months than in winter.
Based on my experience, I have found that mixing one part glue with two parts water and keeping the room temperature warm yields the best fern patterns. Dryness is a crucial factor in achieving successful chipped glass.
3. Creating Unique Snail Patterns:

I noticed a pattern in discovering different techniques called the Snail Pattern Chip.
These chips are unique, leaving minimal sandblasted areas and resembling snails or small nuggets when gilded or silvered.
I have observed that the Snail chip usually develops during the colder winter months. I have also found that preventing the glue from drying too quickly and slowing it down can help achieve a more consistent snail pattern look.
4. Controlling The Environment For Glass Chipping:

Controlling the atmospheric environment is critical to achieving consistent results while glue chipping.
Over the years, I have devised various methods to control and understand the science behind the chipping environment.
The objective of glue chipping is to dry the glue hard on the sandblasted surface, which then needs to contract to create the chipping pattern. However, humidity, drafts, and too much heat or cold can impact the final chipping and patterns achieved.
There are various ways to control the atmosphere in your chipping area. Some people use electric dehumidifiers and room conditioners to achieve consistency in their chipping atmosphere. Therefore, it is essential to understand your environment and climate to control the atmosphere where you place your glass to chip.
A digital humidity reader is an excellent tool to have at hand. They are inexpensive to purchase and provide a wealth of knowledge about your chipping environment, such as relative humidity and temperature, which you need to control.
5. Mastering And Gilding Your Final Piece:

You can apply gold and other finishes on the chipped surface to turn your glue-chipped glass piece into a stunning work of art. Although clear glue-chipped glass looks beautiful, you can enhance its beauty by adding gold or other finishes like translucent enamels.
It’s important to note that the gold leaf may not stick directly to the chipped glass surface, especially in the remaining frosted sandblasted areas. Therefore, it’s essential to understand the right amount of gelatine to use. I recommend gilding chipped glass twice and then clear coat it with varnish or gold size. Afterwards, you can patch in the worst areas before backing up in gold enamel.
Don’t hesitate to experiment with different gilding techniques, such as burnishing or antiquing, to achieve various effects. Learning this along the way has dramatically impacted the final results of my work.
6. BONUS TIP
I know I said I had Five, but I had to include this bonus tip.
I like to apply the glue to warm glass, and this allows the glue “Springs” to remain relaxed and the “Suckers” open while it attaches to the glass.
In Conclusion
Mastering the art of glue chipping is a journey of exploration and discovery. After all, you are mixing the elements of science and art to create beautiful signs and art pieces.
I’m always happy if it chips as planned, and I’ll accept any chipping that occurs, as long as it’s an even pattern, either fern or snail.
By understanding the importance of proper surface preparation, experimenting with different techniques to achieve specific patterns, exploring other materials, and experimenting with different gilding effects, you can unlock new dimensions of creativity and craftsmanship in their glue-chipped glass pieces. Embrace and enjoy the process as you continue to push the boundaries of this timeless art form.
Master the Art Of Glue Chipping
If you would also like to master the art of glue chipping and fast-track your success without the headaches that I had to learn along the way.
- Learn how you can Glue chip glass with minimal fuss & budget
- Remove the guesswork
- Learn the hidden secrets that I’ve learnt from chipping thousands of pieces of glass
- Achieve more consistent results with my proven formulas and methods
- Learn what it takes to control your chipping patterns and how you can influence them
- Master different finishes to turn your chipped pieces into masterpieces.
Join the wait list for my new online Glass Chipping Course that is coming out soon.


Sean
I can’t wait ! Get a wriggle on Dave ,the suspense is excruciating ! If this is anything like as comprehensive as your gilding course I have every reason to believe it’s going to be awesome .